Getting Started
Thank you for selecting the NewsMass Free WordPress Theme!
We trust you’ll find delight in this exquisite personal WordPress blog theme, meticulously crafted for Modern Publishers.
Our team poured considerable effort and affection into its creation. Our aspiration is for your website to flourish using our NewsMass Free theme, potentially leading you to upgrade to the premium offering, NewsMass-Pro.
Documentation Overview: This guide comprehensively addresses installation, usage, and customizer settings for the theme.
We aim to furnish you with clear instructions for seamlessly integrating the theme into your website, acquainting you with its features along the way. We urge you to peruse this document and keep it accessible for future reference.
Should you have queries or require assistance with any aspect of the theme, don’t hesitate to open a Support Ticket. Our support team stands ready to aid you.
Throughout this documentation, we’ll ensure everything is primed for installation, then proceed to theme setup, covering initial configuration and customization options.
Theme Requirements
To use this theme you must be running WordPress 4.0+ or higher, PHP5 or higher, and mysql 5 or higher. Please contact your web hosting service provider to be sure your server complies with the requirements above. To safeguard your website always use secure passwords and the latest version of WordPress and plugins. Be sure to check that php upload_max_filesize and post_max_size are 32M or higher. If you are running shared web hosting you should contact your web hosting service provider to find more information about that. If you are running an unmanaged dedicated server or VPS you should check your php.ini file. Alternatively, you can edit the .htaccess file at the root of your website and add the following values:
php_value post_max_size 32M
php_value upload_max_filesize 32M
Installation
To install NewsMass you can do so in one of two ways:
a. The Simple, No Brainer, Piece of Cake Way:
Upload the provided newsmass.zip file via the WordPress Admin Panel. To do so, go to “Appearance” > “Themes” in the menu, then select the “Install Themes” tab at the top of the page. Once you are on this page, select “Upload,” then “Choose File” to locate the .zip folder on your computer. After doing so, select “Install Now.”
b. The Roll Up Your Sleeves and Use a Little Elbow Grease Method:
Uncompress the provided newsmass.zip file and upload the template contents to the /wp-content/ themes/ directory of your WordPress installation via your chosen FTP client.
Neither method has an advantage over the other, it is simply a matter of preference.
Follow the same instructions above to install the NewsMass-Pro Premium theme, but download the newsmass-pro.zip file instead of the previous zip file.
Activation
Once you have installed the theme, you can go back to the “Themes” page in the WordPress Admin Panel (“Appearance” > “Themes”) and select “Activate” on NewsMass. You’re one step closer to getting your site up and running with NewsMass.
Follow the same instructions above to activate the NewsMass-Pro theme.
Install and Activate Recommended Plugins
After Activating the theme please go to Appearance > Install Plugins and install all the listed plugins.
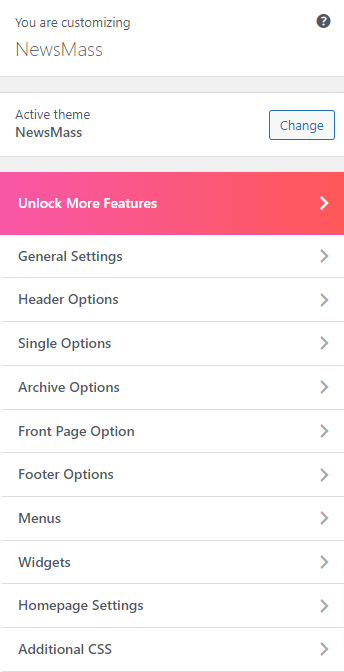
Customizer Options and Setups
When you go to Admin Panel > Appearance > Customize. , there you will see various options available to customize your site. Just try those options one by one you will be able to understand how the theme works and can create any kind of site.
Some Available options in Customizer:
- General
- Header
- Single
- Archive
- Front Page
- Footer
- Menu
- Widgets
- Homepage Settings
- Additional CSS
The NewsMass-Pro Premium theme offers more features than the Newsfor Free theme, as indicated in the customization options. However, some features are identical and not listed in the customization options, though the customization process remains the same as for the free theme.
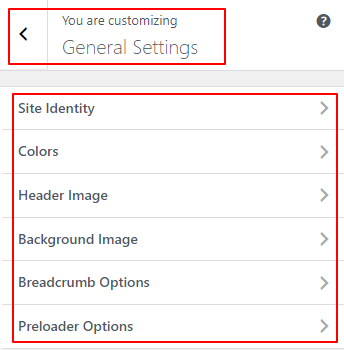
1. General
This section provides options to customize Site Identity, Color options, Header Image, Background Image, Breadcrumb Options, and preloader options.
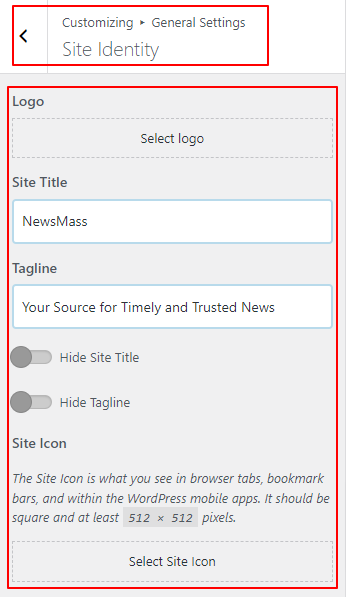
a. Site Identity
- From Customize, go to General Settings and Site Identity
- You will get the options to manage the Site title, tagline, logo, option to display the site title and tagline, and the site icon.
- Use the available options to customize the site title and tagline.
- If the preview is ok click on Publish to save the changes.
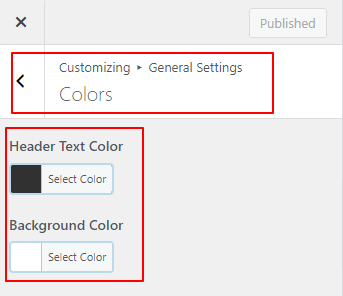
b. Colors Options
- From Customize, go to Color Option.
- You will get the option to change the color of the header text and background color.
- If the preview is ok click on Publish to save the changes.
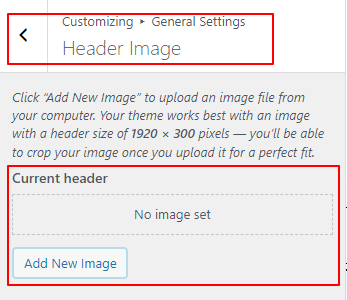
c. Header Image
- From Customize, go to General Settings and Header Image
- You will get an option to add a header image.
- If the preview is ok click on Publish to save the changes.
d. Background Image
- From Customize, go to General Settings and Background Image.
- You will get an option to change the background image of the theme.
- Use the available option to customize the background image.
- If the preview is ok click on Publish to save the changes.

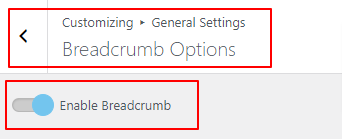
e. Breadcrumb Options
- From Customize, go to General and Breadcrumb Options.
- You will get the option to enable the breadcrumb option.
- If the preview is ok click on Publish to save the changes.
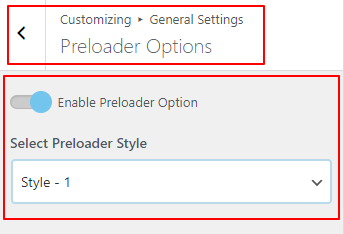
f. Preloader Options
- From Customize, go to General and Preloader.
- You will get the option to enable the preloader and choose the style of the preloader.
- If the preview is ok click on Publish to save the changes.
2. Header
This section allows you to manage and customize the header, offering various options to make it more attractive.
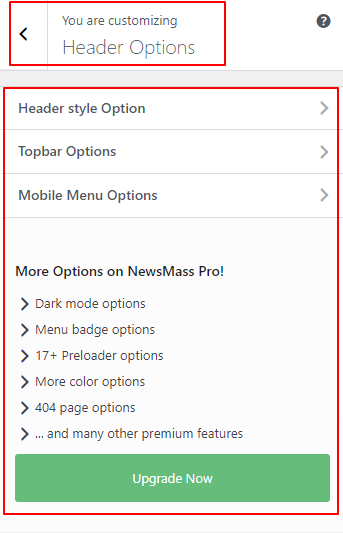
a. Header Style Option
- From Customize, go to Header and Header style Option.
- You will get the option to choose a header layout.
- If the preview is ok click on Publish to save the changes.

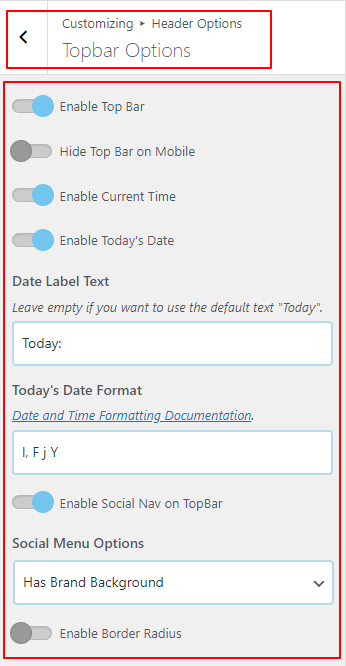
b. Topbar Options
- From Customize, go to Header and Topbar Options.
- You will get an option to enable the top bar, hide top bar on mobile, today’s date and current time.
- You can choose date label text and date format.
- You will get an option to enable social nav on the topbar and choose social menu options.
- You will get an option to enable border-radius to topbar.
- If the preview is ok click on Publish to save the changes.
c. Mobile Menu Options
- From Customize, go to Header and Mobile Menu Options.
- You will get the option to enable the social menu on mobile.
- You will get an option to choose menu options and enable border-radius and copyright on mobile.
- If the preview is ok click on Publish to save the changes.

3. Single
This section empowers you to manage and personalize the single options, providing a range of options to make it visually appealing and distinctive. You can customize various elements to ensure the single options align with your design preferences and branding.
- From Customize to Single Options

a. Single Page Options
- From Customize, go to Single Options and Single Page Settings.
- You will get the option to enable author meta, published date, single category meta, tag meta, read time, sticky article navigation, and author info box.
- You will also get an option to write a title and choose different options for a single page.
- If the preview is ok click on Publish to save the changes.


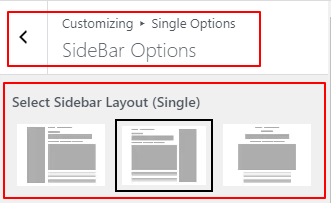
b. SideBar Options
- From Customize, go to Single Options and SideBar Options.
- You will get the option to choose a sidebar layout for a single page.
- If the preview is ok click on Publish to save the changes.
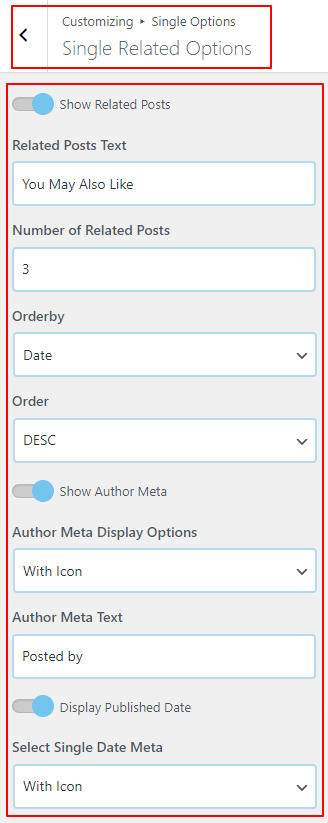
c. Single Related Options
- From Customize, go to Single Options and Single Related Options.
- You will get the option to enable the related posts, author meta, published date, and category meta.
- You will get the option to write different labels and choose different options for the related posts section.
- If the preview is ok click on Publish to save the changes.

d. Single Author Post Options
- From Customize, go to Single option and Single Author Post Options
- You will get an option to enable author post, author meta, published date, and category meta.
- You will get the option to write different labels and choose different options for single-author posts.
- If the preview is ok click on Publish to save the changes.


4. Archive Options
Archive options have a lot of different options to customize the archive of the theme.
- From Customize, go to Archive option.

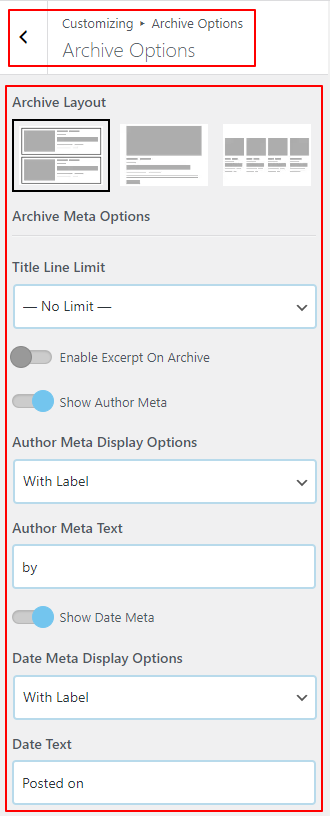
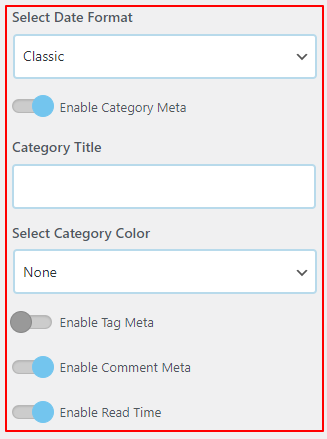
a. Archive Options
- From Customize, go to the Archive Options and Archive Options.
- You will get the option to choose different archive layouts.
- You can enable different options, and add different labels for the archive.
- If the preview is ok click on Publish to save the changes.
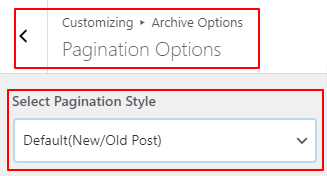
b. Pagination Options
- From Customize, go to the Archive Options and Pagination Options.
- You will also get to choose a different option for pagination.
- If the preview is ok click on Publish to save the changes.
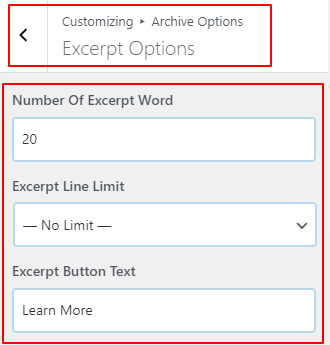
c. Excerpt Options
- From Customize, go to the Archive Options and Excerpt Options.
- You will also get to choose different options for excerpts.
- If the preview is ok click on Publish to save the changes.
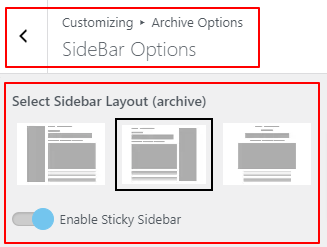
d. SideBar Options
- From Customize, go to the Archive Options and SideBar Options.
- You will also get to choose a different sidebar option for the archive page and the option to enable a sticky sidebar.
- If the preview is ok click on Publish to save the changes.
5. Front Page Option
Front page option has a lot of different options to customize different sections for the front page.
- From Customize, go to the Front Page Options.
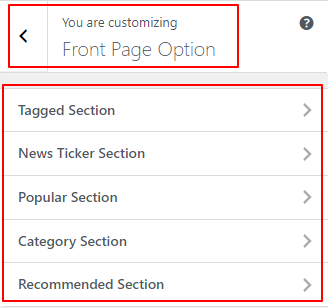
a. Tagged Section
- From Customize, go to the Front Page Option and Tagged Section.
- You will get the option to enable tags, tags labels, and hide labels on responsive.
- You can also choose different options and modify tags’ label text.
- If the preview is ok click on Publish to save the changes.

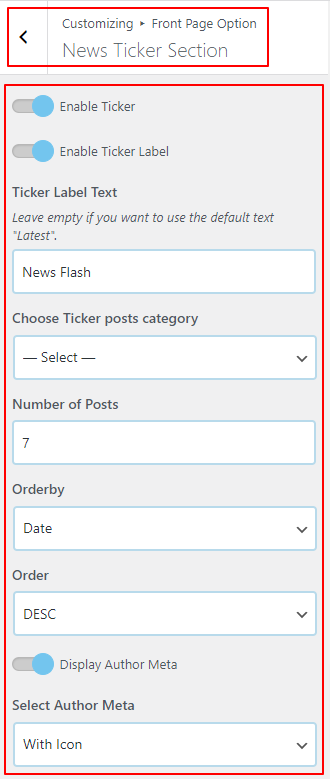
b. News Ticker Section
- From Customize, go to the Front Page Option and News Ticker Section.
- You will get the option to enable ticker, ticker label, author meta, published date, and category meta.
- You can also choose different options and modify the label text.
- If the preview is ok click on Publish to save the changes.
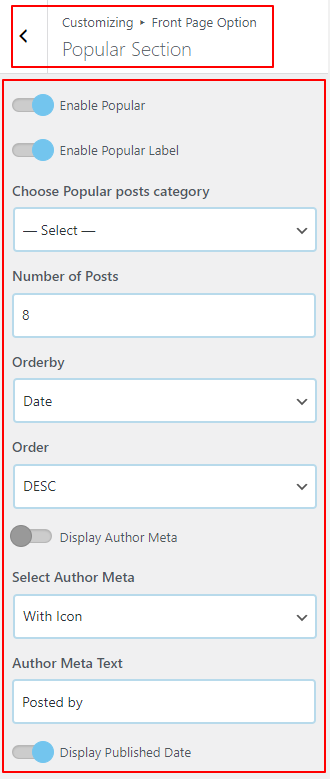
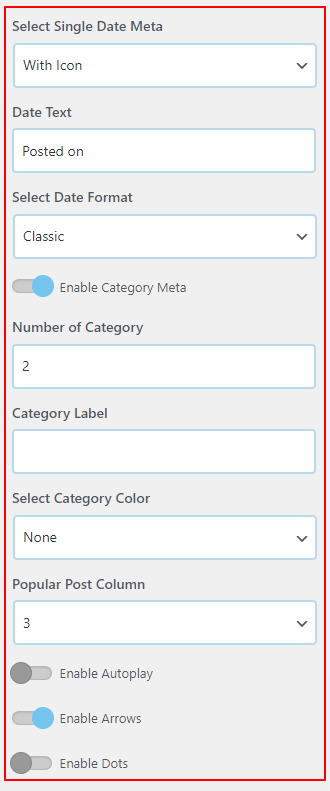
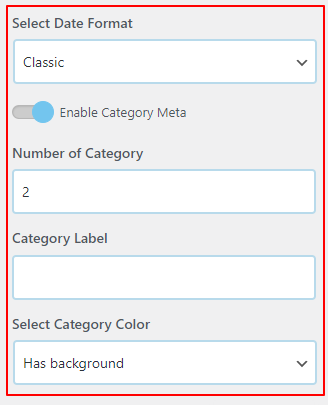
c. Popular Section
- From Customize, go to Front Page Option and Popular Section.
- You will get the option to enable the popular section, popular label, display author meta, display published date, category meta, autoplay, arrows, and dots.
- You can also choose different options and modify the label text.
- If the preview is ok click on Publish to save the changes.
d. Category Section
- From Customize, go to the Front Page Option and Category Section.
- You will get the option to enable the featured category.
- You will also get the option to add a title and choose different options.
- If the preview is ok click on Publish to save the changes.

e. Recommended Section
- From Customize, go to Front Page Option and Recommended Section.
- You will get the option to enable the recommended post section, display author meta, display published date, and category meta.
- You can choose different post layouts.
- You can also choose different options and modify the label text.
- If the preview is ok click on Publish to save the changes.

6. Footer
This section will allow you to choose different options for customizing the footer.
- From Customize, go to the Footer Options.

a. Footer Widget Options
- From Customize, go to Footer Options and Footer Widget Options.
- You will get the option to enable the footer widget area and choose a different footer column layout.
- If the preview is ok click on Publish to save the changes.

b. Footer Copyright Options
- From Customize, go to Footer Options and Footer Copyright Options.
- You will get to option to enable the footer nav menu, social nav menu in the footer, and border-radius.
- You can also change copyright text, choose date format, and social menu option.
- If the preview is ok click on Publish to save the changes.

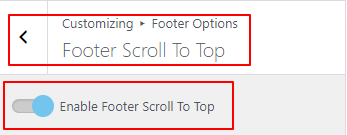
c. Footer Scroll To Top
- From Customize, go to Footer Options and Footer Scroll To Top.
- You will get to option to enable the footer to scroll to the top.
- If the preview is ok click on Publish to save the changes.
d. Footer ProgressBar
- From Customize, go to Footer Options and Footer ProgressBar.
- You will get to option to enable the footer progress bar.
- If the preview is ok click on Publish to save the changes.

7. Menus
This section allows us to create menus for different locations.
- From Customize, go to Menus.
- Once you create the menu as per your wish click Publish to save the change.

8. Widgets
In this section, you can choose different widgets for different widget locations.
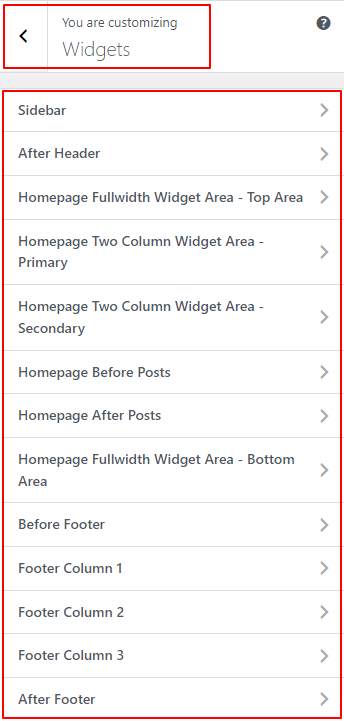
a. Sidebar
- From Customize, go to Widgets and Sidebar.
- You will get the option to add widgets on the sidebar to display it globally.
- If the preview is ok click on Publish to save the changes.

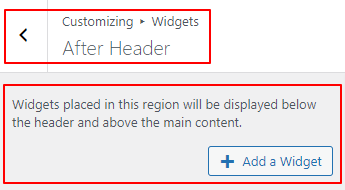
b. After Header
- From Customize, go to Widgets and to After Header.
- You will get the option to add widgets to after header location.
- If the preview is ok click on Publish to save the changes.
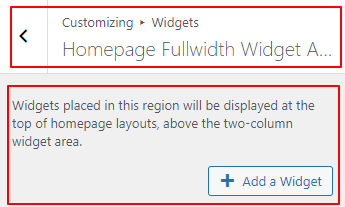
c. Homepage Fullwidth Widget Area – Top Area
- From Customize, go to Widgets and Homepage Fullwidth Widget Area – Top Area.
- You will get the option to add widgets at the top of the homepage layout, above the two-column widget area.
- If the preview is ok click on Publish to save the changes.
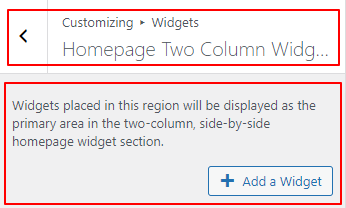
d. Homepage Two Column Widget Area – Primary
- From Customize, go to Widgets and Homepage Two Column Widget Area – Primary.
- You will get the option to add widgets to the primary area in the two-column, side-by-side homepage widget section.
- If the preview is ok click on Publish to save the changes.
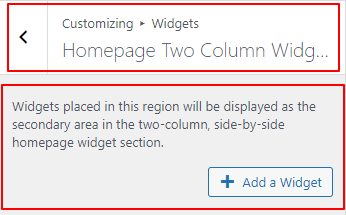
e. Homepage Two Column Widget Area – Secondary
- From Customize, go to Widgets and Homepage Two Column Widget Area – Secondary.
- You will get the option to add widgets to the secondary area in the two-column, side-by-side homepage widget section.
- If the preview is ok click on Publish to save the changes.
f. Homepage Before Posts
- From Customize, go to Widgets and Homepage Before Posts.
- You will get the option to add widgets to the homepage before posts listing.
- If the preview is ok click on Publish to save the changes.

g. Homepage After Posts
- From Customize, go to Widgets and Homepage After Posts.
- You will get the option to add widgets to the homepage after posts listing.
- If the preview is ok click on Publish to save the changes.

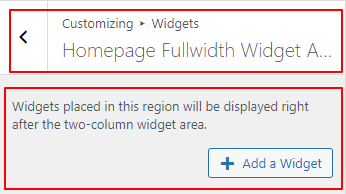
h. Homepage Fullwidth Widget Area – Bottom Area
- From Customize, go to Widgets and Homepage Fullwidth Widget Area – Bottom Area.
- You will get the option to add widgets to the right after the two-column widget area.
- If the preview is ok click on Publish to save the changes.
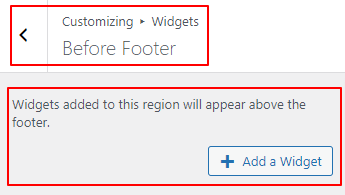
i. Before Footer
- From Customize, go to Widgets and Before Footer.
- You will get the option to add widgets above the footer.
- If the preview is ok click on Publish to save the changes.
j. Footer Column 1
- From Customize, go to Widgets and Footer Column 1.
- You will get the option to add widgets in column one of the footer.
- If the preview is ok click on Publish to save the changes.

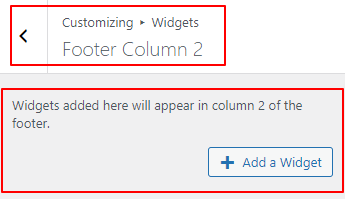
k. Footer Column 2
- From Customize, go to Widgets and Footer Column 2.
- You will get the option to add widgets in column two of the footer.
- If the preview is ok click on Publish to save the changes.
l. Footer Column 3
- From Customize, go to Widgets and Footer Column 3.
- You will get the option to add widgets in column three of the footer.
- If the preview is ok click on Publish to save the changes.

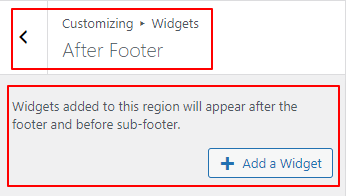
m. After Footer
- From Customize, go to Widgets and After Footer.
- You will get the option to add widgets which will appear after the footer and before the sub-footer.
- If the preview is ok click on Publish to save the changes.
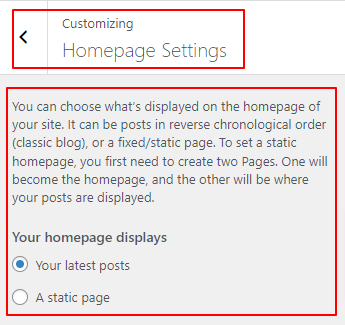
9. Homepage Settings
This section helps you to set the front page and blog page.
- From Customize, go to Homepage Settings
- You will get the option to choose what is displayed on the homepage of the site.
- Use the available options and choose what is displayed on the homepage of the site.
- If the preview is ok click on Publish to save the changes.
10. Additional CSS
This section helps to write CSS code in the box to customize the theme.
- Go to Customize > Additional CSS.
- Then you can add your own CSS in the box to change your theme appearance.
